
Imagine your kitchen cabinets looking brand new, smooth, and perfectly painted. Does that sound like a dream? Getting that professional finish at home can feel tricky, especially when you’re looking at all the different tools available. Choosing the right airless sprayer for your cabinets can be confusing. You might wonder which one is best for the job, or if it’s even worth the effort.
But what if we told you that achieving that beautiful, factory-like finish on your cabinets is totally possible, and not as complicated as you think? This blog post is here to help you cut through the noise. We’ll explain exactly what makes an airless sprayer a fantastic choice for cabinet painting, and we’ll guide you through the important things to consider.
By the time you finish reading, you’ll feel confident in picking the perfect airless sprayer for your cabinet project. You’ll learn what features matter most and how to avoid common mistakes. Get ready to transform your cabinets and enjoy a stunning new look for your home!
Our Top 5 Airless Sprayer For Cabinets Recommendations at a Glance
| Image | Product | Rating | Links |
|---|---|---|---|
 |
VONFORN Paint Sprayer | 9.4/10 | Check Price |
 |
MaXpray M1 Airless Paint Sprayer | 8.7/10 | Check Price |
 |
VEVOR 750W Stand Airless Paint Sprayer | 9.4/10 | Check Price |
 |
Toolrhino Airless Paint Sprayer for House Painting | 8.8/10 | Check Price |
 |
Wagner Spraytech 2435698 Control Pro 130 Paint Sprayer with T2 Gun | 9.3/10 | Check Price |
Top 5 Airless Sprayer For Cabinets Detailed Reviews
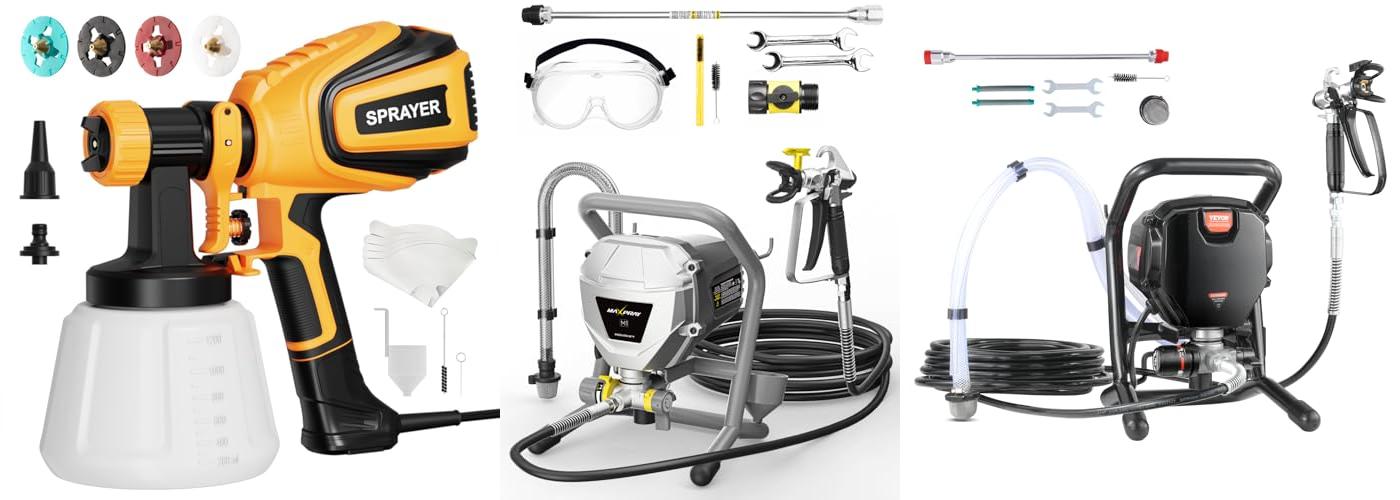
1. VONFORN Paint Sprayer
Rating: 9.0/10
Get ready to transform your projects with the VONFORN Paint Sprayer, VF803. This 700W HVLP spray gun is designed to make painting easier and more efficient for everyone, from beginners to seasoned DIYers. It’s perfect for giving new life to furniture, cabinets, fences, walls, doors, and even your garden chairs.
What We Like:
- It comes with four different nozzle sizes (1mm, 1.5mm, 2mm, 3.0mm), so you can tackle almost any painting job.
- You can switch between three spray patterns – horizontal, vertical, and circular – to get the perfect finish for different surfaces.
- The unique blowing function lets you clear dust and debris before you start painting, ensuring a smoother finish.
- Cleaning up is a breeze with the special cleaning connector that attaches to your faucet.
- It’s super easy to put together and use, even if you’ve never used a paint sprayer before.
- The adjustable flow control knob lets you manage how much paint comes out, helping you avoid waste and get better results.
- The package includes everything you need, like extra filters, a cleaning brush, and a needle, so you’re ready to go right away.
- VONFORN offers great customer support and will reply to your questions within 18 hours.
What Could Be Improved:
- While it’s great for many projects, very large jobs might take longer than with a professional-grade sprayer.
- Some users might find the initial setup requires a quick read of the manual to understand all the features.
This VONFORN paint sprayer is a fantastic tool for anyone looking for a versatile and user-friendly way to paint. It simplifies the painting process and delivers impressive results for a wide variety of home improvement and DIY projects.
2. MaXpray M1 Airless Paint Sprayer
Rating: 9.0/10
The MaXpray M1 Airless Paint Sprayer is your new best friend for any painting project, big or small. It’s designed to make painting faster and easier, whether you’re sprucing up your living room or giving your fence a fresh coat. This sprayer is perfect for DIYers who want professional-looking results without all the fuss.
What We Like:
- It’s super fast, much quicker than using rollers or brushes.
- You don’t need to thin your paint, saving you time and mess.
- It uses less paint because there’s hardly any overspray, which saves you money.
- It’s easy for beginners to use, with helpful guides and videos.
- Cleaning is a breeze, taking only about 10 minutes.
- The 360° swivel joint gives you great control.
- It comes with helpful accessories like a tip extension and safety goggles.
- The company offers good customer support and a warranty.
What Could Be Improved:
- The 10-gallon project limit might not be enough for very large commercial jobs.
- While user-friendly, mastering advanced techniques might still require practice for some.
The MaXpray M1 makes painting projects feel less like a chore and more like a fun DIY adventure. You’ll be amazed at how quickly you can transform your space with this efficient and user-friendly sprayer.
3. VEVOR 750W Stand Airless Paint Sprayer
Rating: 9.0/10
Tackle your painting projects with ease using the VEVOR 750W Stand Airless Paint Sprayer. This powerful sprayer delivers a smooth, even finish on everything from furniture to fences, inside or out.
What We Like:
- It paints super fast, up to 5 times quicker than rolling and 12 times faster than brushing. This saves you a lot of time on big jobs.
- The sprayer gives a really nice, even coat of paint. It uses special technology to make sure there are no drips or uneven spots.
- It’s built tough. The strong motor and metal parts are made to last through many painting jobs.
- Cleaning is simple. The pump comes apart easily, and you get a brush to help clean it. The extension pole means you don’t have to bend or climb as much.
- You can change the speed. This lets you use just the right amount of paint for different surfaces and save money.
What Could Be Improved:
- While powerful, it might be a bit much for very small touch-up jobs.
- Like many sprayers, it requires careful setup and cleanup to work its best.
This VEVOR paint sprayer makes painting quicker and easier. It’s a great tool for anyone looking to get professional-looking results at home.
4. Toolrhino Airless Paint Sprayer for House Painting
Rating: 9.1/10
Tired of slow painting jobs? The Toolrhino Airless Paint Sprayer is here to make your DIY projects a breeze! This sprayer is designed for beginners and will help you paint much faster than rollers or brushes. It’s perfect for everything from painting furniture inside your home to giving your outdoor deck, fence, or siding a fresh new look. It can handle projects up to 5 gallons, making it a great choice for most home painting needs.
What We Like:
- It’s super fast, saving you tons of time on painting jobs.
- You don’t need to thin the paint, which makes starting easy.
- Cleaning is quick, taking only about 10 minutes.
- It’s 30% lighter than other sprayers, making it easy to carry around.
- Built-in storage keeps all your parts organized.
- The tip extension helps you paint high places without bending over.
- The spray gun has a swivel joint for easy maneuvering.
- Customer support is helpful and easy to reach.
What Could Be Improved:
- While lightweight, it might still feel a bit heavy for some users during very long painting sessions.
- The “thinning-free” feature works well for many paints, but some thicker paints might still require slight thinning for the best results.
This Toolrhino sprayer is a fantastic tool for anyone wanting to paint their home with less effort and better results. It’s a solid choice for both beginners and experienced DIYers looking for speed and convenience.
5. Wagner Spraytech 2435698 Control Pro 130 Paint Sprayer with T2 Gun
Rating: 9.1/10
Tired of endless roller strokes and messy drips? The Wagner Spraytech 2435698 Control Pro 130 Paint Sprayer is here to revolutionize your painting projects. This powerful yet user-friendly airless sprayer lets you cover large areas, like your home’s exterior or a big deck, three times faster than a roller. Its innovative High Efficiency Airless (HEA) technology means less paint flying everywhere, making prep and cleanup a breeze. Plus, it handles a wide variety of unthinned paints and stains, giving you flexibility for any job, inside or out.
What We Like:
- Applies paint three times faster than a roller.
- Reduces overspray by up to 55% for cleaner projects.
- Delivers a softer spray for better control and a smooth finish.
- Gravity-fed system makes priming and cleaning quick and mess-free.
- Large 1.5-gallon hopper and 25 ft. hose allow for continuous painting without interruptions.
- Works with various unthinned paints and stains.
What Could Be Improved:
- While good for larger projects, it might be overkill for very small touch-ups.
- Some users might find the initial learning curve for sprayers a bit steep.
This Wagner Control Pro 130 sprayer makes big painting jobs feel small. Get ready for faster results and a cleaner workspace.
Airless Sprayer for Cabinets: Your Guide to a Flawless Finish
Want your kitchen cabinets to look brand new? An airless sprayer can give you a smooth, professional finish that’s hard to achieve with brushes or rollers. This guide helps you pick the right one.
Key Features to Look For
When you’re shopping for an airless sprayer for cabinets, keep these features in mind:
1. Pressure Control (PSI)
- What it is: This tells you how much power the sprayer has.
- Why it matters: You need enough pressure to spray paint smoothly, but not so much that it causes overspray or drips. For cabinets, a range of 500-1500 PSI is usually good.
- Look for: A sprayer with adjustable pressure settings. This lets you fine-tune the spray for different paints and projects.
2. Tip Size
- What it is: The tip controls the width and pattern of the spray.
- Why it matters: A smaller tip (like 0.011 to 0.015 inches) is better for detail work on cabinets. It gives you more control and less overspray.
- Look for: A sprayer that comes with a few different tip sizes, or one where you can easily buy compatible tips.
3. Motor Power
- What it is: This is how strong the sprayer’s motor is. It’s often measured in amps or horsepower.
- Why it matters: A stronger motor can handle thicker paints and spray for longer periods without overheating.
- Look for: A motor that’s powerful enough for the type of paint you plan to use. Oil-based paints or thicker latex paints need more power.
4. Hose Length
- What it is: The length of the hose connecting the sprayer to the paint bucket.
- Why it matters: A longer hose gives you more reach. It lets you move around without having to constantly reposition the paint.
- Look for: A hose that’s long enough for your workspace. Most cabinet jobs don’t need super long hoses, but a little extra length is helpful.
5. Ease of Cleaning
- What it is: How simple or difficult it is to clean the sprayer after use.
- Why it matters: Cleaning is a big part of using an airless sprayer. If it’s hard to clean, you might avoid using it.
- Look for: Sprayers with easy-to-remove parts and clear cleaning instructions.
Important Materials
The materials used in an airless sprayer affect its durability and performance.
- Metal Pump Components: These are generally more durable than plastic ones. They handle pressure better and last longer.
- Quality Seals and O-rings: Good seals prevent leaks and ensure the sprayer works efficiently. Look for durable rubber or synthetic materials.
- Durable Housing: The outer casing should be made of strong plastic or metal to protect the internal parts.
Factors That Improve or Reduce Quality
Some things make an airless sprayer better, while others can make it worse.
Things That Improve Quality:
- Consistent Spray Pattern: A good sprayer lays down paint evenly without lines or drips. This is crucial for a professional cabinet finish.
- Reliable Performance: The sprayer should start easily and run smoothly without sputtering or losing pressure.
- Durability: A well-built sprayer will last for many projects.
- Quiet Operation: Some sprayers are very noisy. A quieter one makes the job more pleasant.
Things That Reduce Quality:
- Clogging: If the sprayer clogs easily, it will frustrate you and ruin your paint job.
- Uneven Spray: This leads to a streaky or messy finish that needs a lot of touch-up.
- Leaking: Leaks waste paint and create a mess.
- Overheating: If the sprayer gets too hot, it can stop working or damage itself.
User Experience and Use Cases
An airless sprayer can be a game-changer for cabinet painting.
User Experience:
- Learning Curve: There’s a small learning curve. You need to practice to get the right technique.
- Setup Time: Setting up the sprayer and masking off your work area takes time.
- Cleanup: This is the most time-consuming part. Proper cleaning is essential for the sprayer’s longevity.
- The Result: When done right, the finish is incredibly smooth and professional. It makes your cabinets look like they were professionally sprayed.
Use Cases:
- Kitchen and Bathroom Cabinets: This is the most common use. It transforms old cabinets into something new.
- Furniture Refinishing: You can use it to repaint dressers, tables, and other furniture pieces.
- Doors and Trim: For a consistent finish on doors and baseboards, an airless sprayer is excellent.
- Large Projects: If you have many cabinets or a large area to paint, an airless sprayer speeds up the process significantly.
Frequently Asked Questions (FAQ)
Q: How do I choose the right tip size for my cabinets?
A: For cabinets, a smaller tip size like 0.011 to 0.015 inches is usually best. This gives you a finer spray and more control, which is important for detailed work and avoiding drips.
Q: Can I use any type of paint with an airless sprayer?
A: Most airless sprayers work well with latex and oil-based paints. However, thicker paints might require a more powerful sprayer or a larger tip size. Always check the paint manufacturer’s recommendations and your sprayer’s manual.
Q: How much overspray can I expect with an airless sprayer?
A: Airless sprayers produce less overspray than other types of sprayers, but there will still be some. You’ll need to mask off surrounding areas carefully and wear protective gear like a mask and goggles.
Q: Is an airless sprayer difficult to clean?
A: Cleaning is a crucial step. While it takes some time, most sprayers are designed for straightforward cleaning. Following the manufacturer’s instructions carefully will make the process easier.
Q: How much does a good airless sprayer for cabinets cost?
A: Prices vary widely. You can find basic models for a few hundred dollars, while professional-grade sprayers can cost over a thousand. For home use on cabinets, a mid-range sprayer is often a good investment.
Q: Do I need to thin my paint for an airless sprayer?
A: Usually, you don’t need to thin latex paint for an airless sprayer. Some oil-based paints might benefit from slight thinning, but it’s best to check the paint can and your sprayer’s manual. Over-thinning can affect the paint’s durability.
Q: How long does it take to spray cabinets?
A: The actual spraying part is fast, often taking only a few hours for a whole kitchen. However, preparation (cleaning, sanding, masking) and drying time between coats can add several days to the project.
Q: Can I use an airless sprayer for both the inside and outside of cabinets?
A: Yes, you can. Just make sure to mask thoroughly if you’re spraying the inside and outside at different times to avoid unwanted paint. You might want to use a different tip size for the inside if the doors are removed.
Q: What kind of maintenance do airless sprayers need?
A: Regular cleaning is the most important maintenance. You should also check seals and filters periodically. Storing the sprayer properly with pump lubricant will prevent it from drying out and becoming damaged.
Q: Is an airless sprayer worth it for just one cabinet project?
A: If you have a very small project, renting an airless sprayer might be more cost-effective. However, if you plan on doing multiple painting projects over time, investing in a good airless sprayer can save you money and give you better results in the long run.
In conclusion, every product has unique features and benefits. We hope this review helps you decide if it meets your needs. An informed choice ensures the best experience.
If you have any questions or feedback, please share them in the comments. Your input helps everyone. Thank you for reading.