

Do you have dusty boxes filled with old photos, negatives, and slides tucked away in your attic or basement? These precious memories are fading with time, and it’s a shame to let them disappear forever. Many of us want to bring these forgotten moments back to life, but the thought of choosing the right negative and slide scanner can be overwhelming. There are so many different kinds, and figuring out which one is best for you feels like a puzzle.
The good news is, you don’t have to guess anymore! This blog post will be your friendly guide to understanding negative and slide scanners. We’ll break down what makes a good scanner and what features really matter. By the end, you’ll know exactly what to look for to turn those old film strips into clear, digital treasures. Get ready to rediscover your family history and share those special memories with everyone!
Our Top 5 Negative And Slide Scanner Recommendations at a Glance
Top 5 Negative And Slide Scanner Detailed Reviews
1. KODAK Slide N SCAN Film & Slide Scanner Digitizer with 5” LCD Screen

Rating: 8.9/10
Remember those old boxes of photos in the attic? The KODAK Slide N SCAN Film & Slide Scanner Digitizer brings those memories back to life! This cool gadget lets you turn your old film negatives and slides into digital pictures. It’s super easy to use and has a big screen so you can see your photos right away.
What We Like:
- It saves your old photos as digital files.
- You can scan different kinds of film and slides (135, 110, 126).
- The 5-inch screen lets you see and edit your pictures easily.
- It has a gallery mode, so you can use it like a digital photo frame.
- Loading film is quick and simple with special holders.
- You can adjust colors and brightness right on the scanner.
- It looks stylish and fits in with your home decor.
What Could Be Improved:
- An SD card is needed but not included with the scanner.
This KODAK scanner is a fantastic way to preserve your precious memories. It makes it simple to share your past with family and friends.
2. Kodak Slide N Scan Max Digital Film Slide Scanner

Rating: 9.2/10
Rediscover your cherished photo memories with the Kodak Slide N Scan Max Digital Film Slide Scanner. This stylish black and yellow device lets you easily convert your old negatives and slides into digital files, so you can relive those special moments again and again.
What We Like:
- Save Old Photo Memories: It converts your old color and black & white negatives (135, 110, 126mm) and 50mm slides into digital files. You can save them directly to an SD card.
- 7” LCD Display with Gallery Mode: The large, clear screen lets you see your photos instantly. You can even use it as a digital picture frame to show off your pictures.
- Convenient Easy-Load Film Inserts: Loading film is super fast and simple with the quick-feeding tray. It comes with everything you need to get started, including holders and adapters.
- Editing with a Single Touch: You don’t need to be a tech expert! The scanner has easy editing options to enhance your photos. You can adjust colors and brightness with just a few clicks.
- Super Chic. Uber Compatible: This scanner looks great in any home. It works with most old slides and negatives and connects easily to your computer.
What Could Be Improved:
- An SD card is not included, so you’ll need to buy one separately.
- An HDMI cable is not included, which limits how you can connect it to larger screens.
The Kodak Slide N Scan Max makes preserving your past simple and fun. It’s a fantastic way to share your memories with loved ones or simply enjoy them yourself.
3. Magnasonic All-in-One 24MP Film Scanner with Large 5″ Display & HDMI
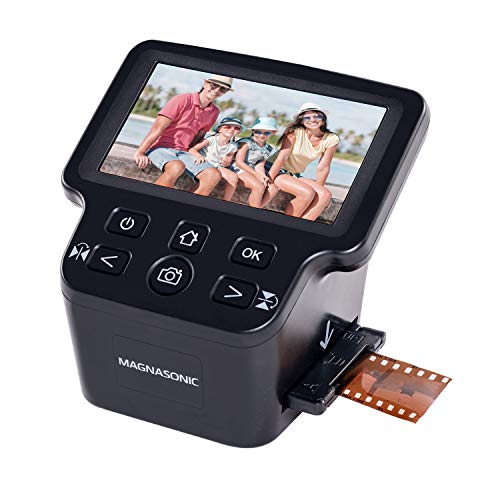
Rating: 9.1/10
Rediscover your cherished memories with the Magnasonic All-in-One 24MP Film Scanner. This amazing gadget transforms your old film negatives and slides into vibrant digital photos. It’s perfect for anyone wanting to bring their past into the present without a fuss.
What We Like:
- Preserves memories: It easily converts 35mm, 110, 126, and Super 8 film negatives, plus 135, 126, and 110 slides into high-resolution 24MP JPEG digital photos.
- Easy viewing: You can see your scanned images on the big 5-inch LCD screen. Or, connect it to your TV or monitor with an HDMI cable for a larger view.
- Plenty of storage: It has 128MB of built-in memory and a slot for an SD card up to 128GB. This means you can save tons of photos.
- No computer needed: You don’t need any special software or complicated setup. Adjust brightness, color, and flip your images right on the scanner.
- Quick and simple: Scanning is fast, taking less than 5 seconds per photo with the easy-to-load film trays.
What Could Be Improved:
- HDMI cable not included: You’ll need to buy an HDMI cable separately if you want to view your scans on a TV or monitor.
This Magnasonic scanner makes it super easy to save and share your old photos. It’s a fantastic way to relive your favorite moments.
4. Kodak SCANZA Digital Film & Slide Scanner – Converts 35mm

Rating: 8.6/10
Rediscover your old memories with the Kodak SCANZA Digital Film & Slide Scanner. This handy device lets you turn your old film and slides into digital JPEG files quickly and easily.
What We Like:
- It converts various film types like 35mm, 126, 110, Super 8, and 8mm into JPEG files in seconds.
- The large 3.5-inch color LCD screen makes it easy to see and adjust your scans.
- It comes with many inserts and adapters, making it simple to load different film types.
- The scanner has big buttons for easy one-step scanning and saving.
- You can edit the RGB and resolution of your images right on the scanner.
- It includes all the necessary cables (USB, HDMI, AC adapter, video cable) and even a cleaning brush.
- The scanner is compatible with both Mac and PC.
What Could Be Improved:
- It only converts specific film types (35mm, 126, 110, Super 8, and 8mm) and no others.
- An SD card is not included, so you’ll need to buy one separately to save your scans.
The Kodak SCANZA scanner is a fantastic tool for bringing your old film memories back to life in a digital format. It’s user-friendly and comes with everything you need to get started.
5. Photo Slide Negative Scanner Scan 4×6

Rating: 8.7/10
Rediscover your cherished memories with the Photo Slide Negative Scanner. This handy device lets you bring your old photos, slides, and film negatives back to life by converting them into digital files. It’s designed for simplicity, making it easy for anyone to use and enjoy their old pictures again.
What We Like:
- It can scan different sizes of photos, like 4×6 and 5×7 inches.
- It also converts 35mm and 135mm slides and film negatives into digital pictures.
- You don’t need a computer to use it; it works on its own.
- It creates high-resolution digital JPG images, up to 22 megapixels.
- The built-in 2.4-inch color screen makes it easy to see what you’re scanning and make simple edits like adjusting color and brightness.
- Setup is a breeze – just plug it in and start scanning.
- Transferring your digital files to a computer is easy with the included USB cable.
- A 4GB SD card is included, so you can start saving your memories right away.
What Could Be Improved:
- The internal memory is only 128MB, which is quite small.
- While it scans photos, it’s primarily designed for slides and negatives.
This scanner is a fantastic tool for anyone wanting to preserve their old photos and film. It’s a straightforward way to digitize your memories and share them with family and friends.
Your Guide to Digitizing Memories: Negative and Slide Scanners
Ready to bring your old photos back to life? Negative and slide scanners help you turn those dusty film strips and glass slides into digital files. This means you can easily share them, store them safely, and enjoy them on any device. Let’s dive into what you need to know to pick the best scanner for your needs.
1. Key Features to Look For
When choosing a scanner, pay attention to these important features:
- Resolution: This tells you how much detail the scanner can capture. Look for a scanner with at least 3200 DPI (dots per inch) for good quality. Higher DPI means a sharper, more detailed image.
- Color Depth: This affects how many colors the scanner can recognize. Aim for 24-bit or 48-bit color depth for vibrant and accurate colors.
- Scanning Speed: How fast does it scan? Some scanners are quicker than others. If you have many photos, a faster scanner will save you time.
- Software: Good software makes scanning easier. Look for software that lets you edit, crop, and improve your scanned images. Features like dust and scratch removal are very helpful.
- Connectivity: How does it connect to your computer? USB is common and easy to use. Some scanners can save directly to an SD card, which is handy.
- Type of Media Supported: Make sure the scanner can handle the types of film you have. Most can scan 35mm negatives and slides. Some can also scan medium format or even larger film types.
2. Important Materials
The scanner itself is usually made of plastic. The important parts are the internal components that capture the image.
- Lens Quality: A good quality lens inside the scanner is crucial. It directly impacts how clear your scanned images will be.
- Light Source: The scanner uses a light to shine through your negatives and slides. A bright, even light source is essential for good color and detail.
3. Factors That Improve or Reduce Quality
Several things can make your scanned photos look better or worse.
- Dust and Scratches: Any dust or scratches on your negatives or slides will show up in the scan. Many scanners have built-in software to help remove these.
- Focus: A scanner needs to focus correctly on the film. If it’s not focused well, the image will be blurry.
- Exposure and Color Balance: The scanner’s software can help adjust how bright the image is and how the colors look. Good software makes a big difference.
- Scanner Resolution: As mentioned before, higher resolution means more detail. A low-resolution scan will look pixelated when you zoom in.
- Cleaning: Keeping your scanner’s glass and the film holders clean will prevent spots and smudges on your digital images.
4. User Experience and Use Cases
Using a negative and slide scanner is generally straightforward.
- Ease of Use: Most scanners are plug-and-play. You insert your film, press a button, and the scanner does the work. The software guides you through the process.
- Who Should Use Them? Anyone with old film photos! This includes people wanting to:
- Preserve family history: Save precious memories from fading away.
- Share photos with loved ones: Easily send digital copies to family and friends.
- Create photo albums: Organize your scanned images into digital scrapbooks.
- Make prints: Print your old photos again with modern printers.
- Use them for projects: Incorporate old images into digital art or presentations.
Scanning your old film can be a rewarding experience, bringing forgotten moments back into the light.
Frequently Asked Questions (FAQ)
Q: What is DPI and why is it important?
A: DPI stands for dots per inch. It measures how much detail a scanner can capture. A higher DPI means a sharper, more detailed image, especially when you zoom in or make prints.
Q: Do I need special software to use a negative scanner?
A: Most scanners come with their own software. This software helps you scan, edit, and save your images. Some scanners also work with other photo editing programs.
Q: Can these scanners scan all types of film?
A: Most scanners are designed for common film types like 35mm negatives and slides. Some advanced models can scan larger film formats, but always check the product details.
Q: How long does it take to scan a roll of film?
A: Scan times vary depending on the scanner and the number of frames. It can take anywhere from a few seconds to a minute per frame. A whole roll might take 15-30 minutes or more.
Q: What if my negatives are dirty or scratched?
A: Many scanners have built-in “digital ICE” or similar technology. This software helps to automatically remove dust and scratches from your scanned images.
Q: Can I scan black and white negatives?
A: Yes, most negative and slide scanners can scan both color and black and white film.
Q: Do I need a powerful computer to use a scanner?
A: You need a computer that can run the scanner’s software. Generally, a standard modern computer is sufficient. Check the scanner’s system requirements.
Q: How do I store my scanned photos?
A: You can save them on your computer’s hard drive, an external hard drive, or cloud storage services. It’s a good idea to back them up in more than one place.
Q: Can I edit the scanned photos?
A: Yes, you can edit them using the software that comes with the scanner or other photo editing programs like Photoshop or GIMP.
Q: Are there scanners that don’t need a computer?
A: Some scanners can save images directly to an SD card. However, you will still need a computer to view, edit, or organize those files later.
In conclusion, every product has unique features and benefits. We hope this review helps you decide if it meets your needs. An informed choice ensures the best experience.
If you have any questions or feedback, please share them in the comments. Your input helps everyone. Thank you for reading.